Intro
Last night I gave a talk and helped run a workshop at Platypus Facts and Hacks Melbourne. In the workshop we identified UART on a router using a USB to UART adapter to talk to the device, and managed to pop a shell or two. These techniques could be used to exploit nearly any kind of Internet of Shit device, since a staggering proportion of these devices have UART shells as a way to test the device.FTDI basics

FTDI is the name of a company that makes chips which have USB on one side and UART / RS232 / TTL / Serial. Since there is more than one manufacturer or USB to UART adapters, FTDI is just synonymous with a USB to UART adapter from any manufacturer since it's less syllables (e.g. Biro == pen).
You can pick up one of these adapters for about $5 on ebay. Just make sure your device has good drivers, and if you like to be versatile, get a chip that can do 3.3V and 5V.
Once you grab your FTDI chip and install the drivers, the device will show up as a COM port on a Windows computer or a "file" in /dev/ on unix like
/dev/tty.usbserialIf you're on unix, a good way to figure out exactly which file is the FTDI chip, is to
ls /dev/ with the device not plugged in, then plug it in, wait a second and ls /dev/ again.
Any new devices that show up must be the FTDI chip!Now you'll need to use a serial monitor to send and recieve serial. On Windows, you can use Putty to interface with the TTL, and unix, you can just use the
screen or picocom command.To talk to a TTY device, you have to specify the baud rate, which is the number of bits per second that the device talks at. If you set the wrong baud rate, your terminal will end up printing out garbage or nothing at all, but it means you're connected to something.
Typically a FTDI cable has 4 to 6 pins:
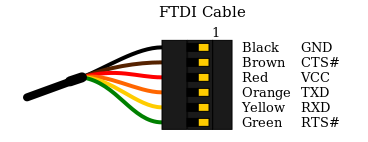
- Ground
- Clear to Send
- +5v
- Transmit Asynchronous Data output.
- Receive Asynchronous Data input.
- Request to send
Identifying UART
Typically we would let the device power itself normally, and then only connect the GND, TX and RX pins (not VCC!) to the uart test pads. Finding them can be quite difficult, but the best method is to look up the router on OpenWRT, and they will usually have pretty good documentation on where the pins are.
If someone else hasn't written up your board, but you can see a collection of test pads, you can identify which test pads correspond to which uart pins with a little bit of heuristics. The more advanced way would be to look for a group of 3 or more test pads, and trace them back to the nearest chip, then look up what each of the pins on that chip do. You could also purchase an expensive logic analyser to do the work for you, but by far the cheapest way involves only a multimeter. We know that at a minimum, the UART header will have GND, TX, RX (and usually VCC) so we can use the multimeter to try and identify these pins.
Don't forget to write up the information you find on somewhere like OpenWRT or your own blog if you can't find the research elsewhere. It will save someone else having to go through the same process as you, and you will get mad internet points.
Identify Ground.
Electronic engineers love ground, so are going to be many points on your board that are connected to ground. Every ground pin is connected to one another, and usually the shielding on different ports on the PCB is also connected to ground. So with the router disconnected from power, have a look for either a group of circular test pads, a row of through holes or a row of male 0.1" headers and begin probing.You can test continuity to ground for each of your test pads to determine which of them are ground. Sometimes the PCB silkscreen will help you out by labelling ground for you
Identifying VCC
VCC is the name given to the positive voltage rail. Sometimes a complex circuit board can have multiple positive rails at different voltages, but a router will usually run on a mobile system-on-chip that runs on 3.3V. With the device powered on, you can test the voltage difference between ground and each pin. Just be careful not to directly bridge ground and VCC since it could fry your power supply. To do this, set your multimeter to measure in the range of 2 to 5 Volts DC (not AC).Depending on the circuitry behind the UART, the VCC will usually stay at a stable voltage of exactly 3.3 or 5 Volts, but the TX and RX pins might have a less stable, lower voltage, particularly during boot when data is being sent over serial.
You may also notice that VCC will have a thicker trace going to the pin compared to TX and RX on some PCBs, and VCC can be labelled on the PCB as Vcc, Vbb, V+, Vee, Vdd or Vss. Just remember that the power supplied to the router by the wall (usually a 12V barrel jack or a 5V USB) will most likely be stepped down to a different voltage on the board.
Another hot tip: to be sure that a pin is VCC, try to identify multiple points that are at VCC relative to ground at different points on the board. Typically you might measure a strong continuity between these pins, even when the board is off, but you might only measure a "blip" of continuity between VCC and TX / RX.
Identifying TX and Baud rate
Now that we've identified which pins are VCC and GND, we can hook GND of the FTDI up to GND of the router, and probe different pads to try and find a pin that's transmitting serial. Simply connect the RX pin of your UART to different points on the board, selecting common baud rates like 115200 and 9600, rebooting the router each time. If you get garbage on your serial monitor, that means your pin is sending some kind of signal, which means you should simply try a different baud rate. This can be a tedius but rewarding process. Be careful not to plug any of the pins you identified as VCC on the board in to your FTDI's RX or you could break stuff. This script may be of use as well! https://github.com/devttys0/baudrate/blob/master/baudrate.pyIdentifying RX
Now that you've got your TX and know what baud rate to listen to, you can start trying to find the RX pin on your board. RX is usually right next to TX but just be careful again not to plug VCC in to the TX on your FTDI. You just connect the TX pin of your FTDI to each potential RX pad on the board, typing stuff in to your serial monitor each time and if your serial monitor starts behaving like a TTY then boom! You've got UART baby. Depending on what serial port you end up on, you could be listening to the debug logs of a subprocessor on the board, so you may have to keep hunting until you get a serial port connected to the main SoC that resembles a linux TTY with stuff like kernel messages and diagnostics.No UART? No Problem.
If you weren't able to identify the UART, you can still have some fun with JTAG, but that requires special hardware like a Bus Pirate, and who even has $25?
Getting Shell
Now that you've got UART, depending on your choice of router you may need to do some trickery to get a shell. Carefully read the output of the router when it boots, and look for stuff like "press return now for console". Other kinds of routers require you to type something like "system console" or "shell" to get a shell, but you may need to type "help" to figure out the exact syntax it requires. If you have no luck figuring out how to get shell, some google dorking will be helpful here. Look for research or manufacturer documentation on your router or a similar router from the same manufacturer. Consider the fact that cheaper routers from obscure manufacurers like the ones you find on Alibaba will often be rebrands of other manufacturers. Otherwise, fuzzing techniques may be required here.Rooting
If you've got a shell, and you're really lucky, sometimes it will drop you straight in to root, otherwise it will ask you for a login / password, This is where you can try to guess the manufacturer's root password, which will typically be hardcoded in the device firmware and selected from a handful of root passwords that a given manufacturer uses. Again, you'll need to do some dorking to get some research or docco that mentions this root password. If your dorking is unsuccessful you may have to brute force it, which is much easier to do on unix. This would typically involve piping a password cracking utility like Hydra to the UART and listening to the response, but you will probably need to write some kind of Python script to set up and manage your pipes.Post-coital Router Shenanigans
Now that you've rooted your router, the sky is the limit. If the router has enough memory you can install all kinds of fun things on it. Often smaller routers will have extremely limited storage, so you may need to commandeer one of the USB ports on the router to store install extra packages on a hidden USB drive.If you want to easily install linux packages and don't mind being easily detected, you can reflash the firmware to something like OpenWRT or TomatoRT which comes with the opkg package maanger.
Some ideas:
- Persist on a target network
- Sniff traffic to discover services on the network
- Mess with the network's routing table and DNS to re-direct traffic to a box you control
- Bitcoin mining?
- ????
- Profit
No comments:
Post a Comment