Evolution
Genesis
Using the designs of the Prusa i3, created by Josef Prusa we had the aluminium frame cut using an industrial water jet cutter and sourced as much of the electronics and hardware from local stores. Altronics had all the cabling, the arduino micro, various electronics and a small selection of nuts and bolts. The smooth and threaded rods came from various local hardware stores.
Once we had gathered all the pieces together, the printer came together really quickly. Within a few hours we had assembled most of the printer, and we had an awesome 3-axis robot that moved around with serial commands within a few days.
Warping
After finishing construction we had some issues relating to the reliability of prints, namely getting prints to stick to the heated bed. We mitigated this by increasing the temperature of the heat bed, this was helped by insulating the underside of the bed with styrofoam wrapped in Aluminium foil to decrease thermal losses and adding a layer of Kapton tape to the print surface to increase the print adhesion. This worked great but after some months of use we found the heated bed (which is essentially just a fibreglass circuit board) had started to warp, so we decided to splash out and get a piece of glass cut (actually only cost $5 from a local glass cutter). Having the glass made a world of difference, it made levelling the print bed much easier and the build surface was now perfectly flat. No more would prints fail to stick!Software
Our printer management software of choice has been Octoprint which runs on our Raspberry Pi and provides an excellent graphical interface to the Arduino micro controller using a web server. You can upload your gCode files to it and initiate prints along with the ability to manually control temperatures and movement, very useful for calibration. In the photo below you can see the raspberryPi mounted on the right hand side of the frame.
Bowden Extruder
Now that we had unlocked the "relatively stable print quality" achievement with our mostly vanilla i3, we really started to tinker with things. The fist major deviation from the i3 blueprint came with our implementation of a bowden extruder, it was a huge upgrade to our heavy, direct drive extruder that was causing a lot of backlash on the X axis. The first extruder we used was a slightly modified QU-BD MBE V9 direct drive extruder which we turned into a bowden setup with a few custom parts, later on we switched to E3D V6 hotends and re-designed our own bowden motor mount. The different designs for the motor mount can be found in this repository.
| QU-BD direct drive extruder |
 |
| QU-BD bowden extruder |
| E3d V6 hot end |
Two heads are better than one
By far the biggest upgrade we have done to the printer is add a second extruder to it. This allows it to do a few extra things that are just impossible with a single extruder, first it can do two colours (see below) and it can do different plastic types. The main reason for the upgrade is so it can print with a soluble support plastic along with the normal plastic, this opens up a realm of possibilities.Acrylic Case
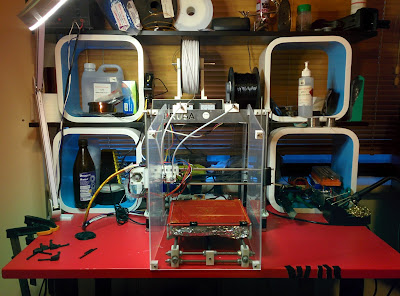
Our most recent mod is probably our most unique. Although our cider box thermal solution was actually pretty effective, to further combat the issues we had with warping we designed an acrylic case to try and retain some of the heat from the heated bed and block any draughts. Although it took a while to refine the design using Open SCAD, it was really surprising how easily this case came together after we got the pieces laser cut. You can find the design files here.
 |
| Before |
| After |
The Future
Our plan is to continue to work on improving the print reliability, and increasing the z axis print height. This will require modifications to the heat bed mount and hot end mounts as these are the parts most vulnerable to vibrations and effect the print height. |
| Printer desk |
I recently designed and printed a roller bearing to be printed in one piece and then the support material holding the rollers in place can be dissolved away to create a working bearing. I'll discuss this in a future post.
Matt
No comments:
Post a Comment